Saturday, November 21, 2009
Gum Drop Goodness
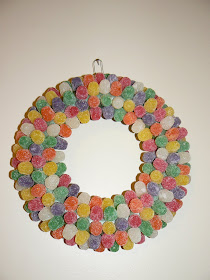
This idea actually came from a Martha Stewart craft book, and of course, like all things Martha, just looked decadent in the book (hers was made entirely in cream-colored gum drops). In reality, mine doesn't look like hers, but I'm satisfied with it.
First, I bought two bags of "spice drops" as they're called at Wal-Mart for a $1 a bag. Before you start, take some wire and make a loop for hanging, so your gum drops can circle around it. Martha said to take toothpicks and break them in half, then stick the pointy ends into the wreath. Then you stick on the gum drop. Easy enough. Start your inside row first, but don't go all the way around. Instead, work in pieces and strips all over the wreath, so it has a uniform pattern.
In theory, the toothpick idea is super. In practice, I'm not sold. Half way through the wreath (and this is a smallish 8-inch wreath form, which cost about $4), my thumb and pointer finger were burning from the pushing the wooden sticks through the foam resistance. My thought is to hot glue the drops on, although I have yet to do it. I'd like to buy some foam cones and cover them with drops, so maybe I will try it then.
All in all, I'm pleased, and for the cost, it wasn't terrible. The multi-color drops aren't too Christmasy, which I was going for. I imagine you could buy a solid set of gum drops at a candy store, but I know those types of candies can run about $5 a pound, so that becomes cost ineffective for me right now.
Thursday, November 19, 2009
Folding Trees
Wednesday, November 11, 2009
Crafty Christmas Wreath
After spending many, many blog posts and much, much of my time on decorations and design for the house, I got back to being a bit more crafty tonight.
I saw something similar in a magazine and went to work today. It was actually pretty easy, but very tedious. I used a matching scrapbook paper kit from Big Lots (yay for cheap prices!), and cut the paper into 1X5 inch strips with my cutting slider. Then I stapled the ends together before hot gluing them in strips around the 12-inch wreath form.
Total time to complete the project was about three straight hours of work. And I mean straight. And every time I thought I had cut enough strips, I had to cut more.
About the time it became difficult to put more layers on, I added the ribbon to tie it off, wrapping it around the open section several times and securing with hot glue.
Yes, friends and family, you may get one of these for Christmas. :)
Cost: Wreath form - $4.50
Ribbon (leftover)- $0.50
Paper - $2.00
I have another wreath idea I'll be putting into life in the next week or so, so stayed tuned! Super easy and super cheap!
Tuesday, November 10, 2009
My first Dumpster Dive
Yup. I drove past a neighbor's trash can, thought about the contents, then turned back around and loaded up.
I found these three pieces from a room divider just sticking out of the trash. I've been looking for a tall picture frame or piece of art work to go in our hallway, and I think I can work these into something. The openings are 8X10, so I can either get prints of more wedding pics and such for it, or put together paintings or mixed media pieces for the frames. They're very nice quality.
And if I can't, well, they do collect the trash every Tuesday. :)
Thursday, November 5, 2009
Repurposed Pillows — With some razzledazzle
I wanted to add some colorful pillows to our living room, but they've been a little out of budget for me to buy them, plus, they're so easy buying a pillow takes the fun out of making a pillow. I found these pillows at a Salvation Army for $1 each. Yesterday, I cut off the ugly coverings to expose pristine stuffing.
I had found a lovely curtain panel at my favorite discount store for $10, but knew I couldn't use it in the living room, so I saved it for pillow fabric. I cut it up to cover the two pillows, and I still have some left over for another project.
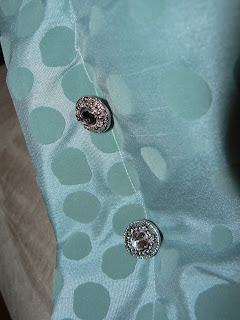
The pillows would have been fine to stand alone, but they needed a little sparkle, so for $8 I bought 12 jeweled buttons.
When sewing, try using gray thread instead of white or black if you don't have a plethora of thread at your disposal. The gray is more neutral than either black or white and winds up blending pretty well into your fabrics and doesn't stand out as much.
Total cost of the project: $24 for two pillows. Not bad.
Tuesday, November 3, 2009
Bluegirl Designs - Check it out!
One of our most unique and special wedding gifts was this hand-embroidered art. Though it's in a frame, there is enough fabric that I can make it into a pillow if I wish.
Happily, instead of having to plan a wedding, get married and all the while befriending the lovely Brandi Bradley, creator of such fine embroidery, you can purchase items of similar crafty brilliance (but still befriend the lovely Brandi).
Check Brandi out at her Etsy store or follow her on her blog.