Sunday, November 11, 2012

Clearance brag!

I have a lot of nice things in my house. This is for several reasons, none of which include me or the hubs spending a lot of money.

Several of our nice things have been gifted to us. Several things have been thrift store finds. Several have been handmade (my grandfather-in-law has made no fewer than seven major pieces of furniture in our home and my mother helps all my fabric dreams come true). And several of our nice things are clearance buys that you just can't pass up.

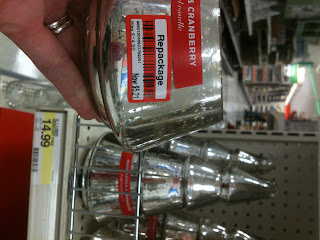
Like this candle. Did I need a new candle? Kinda, not really. But as I was in Target this weekend, I of course browsed all the clearance items on the end rows and found this "warm amber and cranberry" scent for $5.21. BUT when I noticed that one row down included its full-sized brothers and sisters for $14.99, it looked even more appealing. Obviously, someone had broken the Christmas tree top, and the lovely employees at Target just slapped on a new sticker. Other than being free, this is best-case scenario!

Now my mantle has this beautiful brushed silver candle adorning it, and my house smells like a million bucks. Seriously, it even smelled up my car while I was driving home.


Other favorite clearance purchases include a black lace dress from Banana Republic for $7, buying 95 percent of my Christmas decorations after the holiday, oh, and a heavy-duty snow shovel for less than $1 from Kroger last year. It never snowed after I bought it, but hey, I've got a snow shovel if we need one! What are some of your best clearance buys?

Wednesday, October 31, 2012

Peacock Costume

Last year, I didn't even bother dressing up since I had no where to go. This year, I decided to participate in our church's Trunk-Or-Treat and some of the folks take it mighty seriously. Plus, they added a costume contest with an adult division.

I love competition. 

I've known for a month or more that I wanted to be a peacock for Halloween. But, like the good writer I am, I prepared by gathering all my supplies...then I waited until the last moment to put it all together. 

Note to self: Creating a fairly tedious costume design and starting at 9:30 p.m. the day before you want to wear it, is dumb.

Anyway. Onwards and upwards!


I was dealing with peacock feathers and pillowy substances, so of course Baxter was my constant trouble maker helper. My base for the costume was a Jessica McClintock dress I bought at a yard sale two years ago. It's a strapless teal and green ball gown with understated jewell trim along the top. I paid 75 cents for it. No, that's not a typo. However, since that time, I have gained some weight, so my mission this past month was at least to get it to a point where I can safety-pin it shut. Mission accomplished.


I also needed a base for my peacock feather plumage. I stole a piece of cardboard from a boxed punch bowl set I had (oddly, my hoarder self didn't keep a single bit of cardboard lately). I cut it to fit comfortably at my back.


I bought three plumes of peacock feathers at Michael's using discount coupons. I priced a lot of feathers and was thrilled to find Michael's had these guys for about $6 a pop before discounts. I positioned them where I thought they'd look best, then used wire cutters to trim the picks.


I also wanted a little extra flair to the tail instead of just feathers, so using some tulle I already had and some I bought at Hobby Lobby for 99 cents (hello, sparkles!), I hot-glued a row down first.


Next, I duct taped the plumes on. I also added holes in the base to later use ribbon to tie it to my waist.


Next, I started adding gold sequins. I started at the bottom and layered them like shingles or scales. The top of the sequins had tiny holes, so I tried to keep those at the top to be covered up by the next row. Also good to note, even my cool temp glue gun kind of warped the sequins, so I tried to keep the glue dot up top.


The tail! I added 3 yards of turquoise ribbon through the holes to tie it at my waist.


Finished product! Sorta. My hair isn't fixed as it will be tomorrow night. And if we stay outside for the Trunk or Treat, I'll be wearing fleece pants. And maybe a hoodie. But, to be more conservative, I added a gold sparkly cardigan on top of the dress so I'm not too exposed for the kiddos. :)


And....the mask. I bought this little nifty thing at Hobby Lobby, and had all these grand visions of a Mardi Gras/masquerade mask. Well. It kinda happened. The eyes were way too small for me to see out of, so I had to carve out bigger sockets into the mask. So that was kind of a downer. Then, it was a little rounder on my face than I had planned. But, I added some gold glitter glue to jazz up the front, and added the top plumage with a little grouping I also bought at Hobby Lobby.


Total cost of my project was less than $30 thanks to many trips to Michael's and Hobby Lobby and all the coupons I was able to take advantage of. Plus, I used some things that I already had like the dress, gold sparkle shoes (that may be traded for tennis shoes tomorrow) and peacock feather earrings.

Now if I can just keep Baxter out of the feathers one more night, we're golden. 

Sunday, April 15, 2012

Banana Bread Bazinga


For the past year, I've had a hankering for banana bread. I love all kinds of cakey-breads: banana, poppy seed, lemon, blueberry, doesn't matter. Unfortunately, every time I want to make banana bread, I never had what I needed to make it with — not even the bread pans. My mother-in-law bought me these fabulous Farberware bread pans for Christmas, and I finally had everything I needed.

Well, except a a sieve. I purposely bought the sifter around Christmas to make banana bread (my instructions ask me to sift), and then, I've already lost it. Sigh.

Anyway, this is a recipe from my high school home economics teacher that I still keep in my recipe notecard collection from home ec (it includes a basic dough recipe, homemade pizza, monkey bread, etc.). I made it tonight, and it turned out sooooooo good, even though I didn't sift my dry ingredients, and even though I didn't grease my pans enough.

The key to the recipe is a trick from my mom: Before placing in the oven, sprinkle the loaves generously with sugar for a little razzle dazzle crunch.

Just thought I would share...I'm not a baker by any means, but it felt nice to bake something that didn't arrive at my house in plastic first!

Without further ado, here it is:


Ingredients:
2/3 cup shortening
2 eggs
2 cups flour
1 cup bananas
1 1/2 cup sugar 
1 tsp vanilla
1/4 cup buttermilk
1/2 tsp salt
1 tsp baking soda
1/2 cup nuts (optional)

Cream shortening, sugar, eggs and vanilla. Sift together flour, salt and baking soda. Add to creamed mix. Add bananas and milk. Divide into two greased loaf pans — sugar the tops! Bake at 350 degrees F for 30 minutes in medium-sized loaf pans. Cool on wire rack.

Enjoy!

Saturday, April 14, 2012

Lap Quilt Deluxe

After a busy, busy, busy March, I've returned to show you my latest project. I have a few weddings coming up and decided to personalize their wedding gifts with a bit of quilting.

I found this great pattern, featured here on the cover of Quilts and More, a Better Homes and Garden special interest product, and went to work. The original pattern calls for a reversible quilt, but since I have two upcoming weddings, I decided to make the quilt one-sided, and save the other "front" for another gift.

My next job was to pick out the fabric. My mom recently acquired a ton of fabric, and I found this lovely gray print with about five yards in it and I knew I could use it for a quilt. I took a swatch with me to Hancock's of Paducah, which sells dozens of jelly rolls and Tonga treats and such and matched up with a jelly roll. The pattern calls for 2 1/2 inch strips, and I could make the two tops out of one jelly roll.


I couldn't quite figure out how to productively use my rotary cutter to cut the strips, so I created this form of measurement and just used my scissors.


I found a great pastel teal fabric to use as the border, then took the whole top in with me to another fabric store, where I picked out a black-patterned backing. I was looking for something in white cream, but the black just called to me (and it adds the perfect touch of modern sensibility to the quilt). Since the fabric wasn't large enough at 44 inches, I pieced it together, making sure I left plenty to hang over for the binding.

I debated whether to tie the quilt or get it machine quilted, but decided in the end to go ahead and get it machine quilted by the same lady who did my last quilt. She also binds it for you. :)

So this is the finished product, as shown by Baxter. It is a lap quilt, and measures 51 inches x 60 inches.


Close up of some of the fabrics and the feathered pattern I went with.


The backing with its patterns.

In the end, I love the machine quilting, but the cost, though worth every penny, was slightly pricey simply for my tiny budget ($50 for the quilting, batting and binding). So the next one I make, I think I'll tie it.

Thursday, January 19, 2012

Soap bar pincushion

A page from Real Simple inspired my latest project...a soap bar pincushion.

In all my sewing, I still had my pins left in their original plastic pin box, which was annoying to say the least. I kept saying I wanted a super cute pincushion, and not just one of those strawberry/tomato things. 

To start, I bought a bar of handmade soap from the artisan market in Paducah where I sell my fabric bowls. The artisan who makes them had a dozen scents, and this one, mountain berry, has been in the craft room for over a month, and it's totally fragranced the whole area. And I supported a local crafter! You can use a brand name bar of soap, but this one was square, and I wasn't sure I could find one like it anywhere else. 


Then I picked out a fabric scrap I had in my stash. 


I squared off the fabric and made sure I had enough to wrap the bar in, just like you would wrap a present. To get things started with a crisp line, I stapled the fabric to the bar first.


Then I wrapped the other side over, stapling it tight as well. I made sure to tuck the raw end of the fabric under. I also added a strip of hot glue to secure the seam.


Then I continued folding just like I did three weeks before for Christmas. I added a few staples here and there to ensure tightness, but glued everything down and tucked in all the raw edges.


Finished end. I did the same thing on the other one.


When I was done, I had a wrapped package, but it was a tad plain. I thought about razzle-dazzling it up with some rhinestones, but didn't want it to interfere with the pins. So I cut a length of white satin ribbon to cover up the seams and the few remaining exposed staples, hot glueing it down (tuck in the raw edge!).


And there you have the finished project! 


I had picked out the purple fabric weeks ago, then for Christmas, my friend Jennifer MADE ME a wrist pincushion, which was next on my list of things to tackle. She made it completely from scratch, even hand-sewing where a machine would have made her life so easy! I love wrist pincushions to have a place to put my pins when I'm done sewing...my dear Desmond, brother, doesn't really like sewing over pins, so I have to take them out as I go.


Sunday, January 15, 2012

10 minutes of organization

This week, I went through all of my old scrapbook stuff and attempted to organize it in a way that is more crafty, less scrapbook-y. Which went well. (I'm not scrapbooking anymore...too time consuming, and plus, I'm in love with Shutterfly.) Anyway, in my rummaging, I found clear page protectors, which inspired me to put them to good use.

So a trip to Wal-Mart for binders led to this:


Yes, that's a Mudslide in the pic. :)

Which led to this:


I had recently gone through over a hundred Real Simple and Better Home and Garden magazines for the sake of recycling, and had ripped out several ideas/inspiration pages that were just stacked on a clipboard. And I realized I had several patterns for quilts and such, and why not keep them in one place? So I feel good about my future organized productivity plans.

Also sad to report that Wal-Mart binders were much cheaper than binders at Office Depot, which is one of my favorite stores, and was also open past 7 on a Sunday night. Damn Wal-mart yet again!

Thursday, January 12, 2012

Quilt Crazy

I mentioned in my last post that I made a quilt for my mother-in-law for Christmas in 2010, so I wanted to make sure I included pictures.

It all starts with a pattern. I knew I needed something with plenty of rotary cutting and straight lines, because even though I've made four quilts and two wall-hanging in high-school and college, it had been a while since I had done anything this complex. I chose "Basket Weave" a pattern by Diana McClun and Laura Nownes. The pattern was quite easy, for the most part, if you read directions. I, of course, have zero patience, so I spent a good deal of deadline time ripping stitches.


Next are the fabrics. I knew I wanted to do it in blues, but no Duke-blue. My in-laws are from North Carolina and they are decided UNC fans. I spent an entire hour picking out eight shades of blue with as little Duke-blue as possible!


Most quilters, especially the younger ones breaking into the craft, are experienced rotary cutters. I don't think I will ever make a quilt I can't cut entirely with a rotary. There are a few different rotary methods (my mom and I each do it differently). I like to iron my fabrics, fold them in half again, and line them up on my ruled mat. Then I slide my ruler away from the cuts, leaving the cut out in the open.


Of course, you need a helper:


And this was the finished quilt-top. Martha's Quilting in Ledbetter, Ky., did an excellent job quilting it, and included an embroidered gift label on the back.


The husband's cousin was also set to have a baby this fall, so I made this baby quilt in the nursery colors:


I made it from a pattern I received from my high school home-ec teacher, and it's super easy. It involves about three yards of fabric, and it is good for a baby quilt or a wall hanging.

I loved the way the borders turned out:


I wound up quilting this one on my machine, using the Warm and Natural cotton batting, and sadly I wasn't very happy with the end result. I didn't have a walking foot and my machine at the time couldn't drop its feed dogs, so it was a little puckered in places. But it was still quite vibrant and I hear the recipients loved it!