Tuesday, December 1, 2009

Glitter pine cone ornaments


Probably the most simple, tried and true kids craft, glitter pine cone ornaments are timeless, if done correctly.

Somehow, God granted me the privilege of living in front of a grove of towering, whispering pines, which had a nice crop of pine cones on the floor for me to collect - free of charge of course.

After I cleaned all the resin and needles out of them, I went to work.

The first step in making a successful pine cone ornament, or at the very least a decorative pine cone, is fastening a tie to the stem of the cone. This way, you can hang it as an ornament, or after hanging it to dry, you can remove the ribbon.

While holding the ornament by the tie and using regular school glue, cover the tips lightly with glue. I made the mistake of using too much glue the first time, and it dripped while drying.

Then, using fine glitter, lightly dust the tips. As with first-grade Glitter 101, make sure you keep your glitterings over a paper plate or newsprint, and save the excess to use again. My choice of glitter this time was the Martha Stewart collection of reds I bought on sale at Wal-Mart for $5. The package said it's for stamping crafts, but is way more valuable to me for other things and giving a little razzle dazzle to ordinary projects.


To go with the glitter cones, I tried spray-painting several other cones a bronze color with leftover paint from my earlier lamp project. They didn't turn out quite like I wanted them to (I think I went too heavy on the paint), and in the painting process, had the paint leak from my crafting cloth onto my patio table.


I liked the cones better as a center piece, so I grouped them all in a crystal bowl I had my grandma dig out of her basement when I visited for Thanksgiving.

Cost of project: $0.50. I probably used less than a quarter's worth of glitter and about a quarter's worth of spray paint. What an awesome way to make a cheap decoration!

And the Gum Drop goes to...


Grandma Bebe.

Yes, her name is Bebe. And she is every bit as exciting as a Bebe could be. Bebe is crafty. Rather, she is artistic. She paints in oils (hundreds of paintings in many family members' homes). She also puts together gigantic dollhouses, making teeny, tiny flower arrangements out of paper scraps and wire, or making lamps out of mini perfume bottles and lids from toothpaste caps. Ingenious.

Anyway, her birthday was two days before Thanksgiving, so Bebe got my prototype gum drop wreath. Happy Birthday, Grandma!

Right now, I'm swamped at work, so crafty time has been limited. But, I do have some stuff I've created for kids Christmas crafts I'll post on here within the week. And by the end of this weekend, hopefully, we'll be done decorating for Christmas. I'll post pics then, too.

Happy December!

Saturday, November 21, 2009

Gum Drop Goodness


This idea actually came from a Martha Stewart craft book, and of course, like all things Martha, just looked decadent in the book (hers was made entirely in cream-colored gum drops). In reality, mine doesn't look like hers, but I'm satisfied with it.

First, I bought two bags of "spice drops" as they're called at Wal-Mart for a $1 a bag. Before you start, take some wire and make a loop for hanging, so your gum drops can circle around it. Martha said to take toothpicks and break them in half, then stick the pointy ends into the wreath. Then you stick on the gum drop. Easy enough. Start your inside row first, but don't go all the way around. Instead, work in pieces and strips all over the wreath, so it has a uniform pattern.


In theory, the toothpick idea is super. In practice, I'm not sold. Half way through the wreath (and this is a smallish 8-inch wreath form, which cost about $4), my thumb and pointer finger were burning from the pushing the wooden sticks through the foam resistance. My thought is to hot glue the drops on, although I have yet to do it. I'd like to buy some foam cones and cover them with drops, so maybe I will try it then.

All in all, I'm pleased, and for the cost, it wasn't terrible. The multi-color drops aren't too Christmasy, which I was going for. I imagine you could buy a solid set of gum drops at a candy store, but I know those types of candies can run about $5 a pound, so that becomes cost ineffective for me right now.

Thursday, November 19, 2009

Folding Trees

Thanks to Folding Trees to giving Razzle Dazzle Crafting some publicity today!!! Seeing my wreath on someone else's Web site was super cool!

Check it out here:

Stay tuned: Gum drop wreath instructions and pictures coming soon!

Wednesday, November 11, 2009

Crafty Christmas Wreath


After spending many, many blog posts and much, much of my time on decorations and design for the house, I got back to being a bit more crafty tonight.

I saw something similar in a magazine and went to work today. It was actually pretty easy, but very tedious. I used a matching scrapbook paper kit from Big Lots (yay for cheap prices!), and cut the paper into 1X5 inch strips with my cutting slider. Then I stapled the ends together before hot gluing them in strips around the 12-inch wreath form.


Total time to complete the project was about three straight hours of work. And I mean straight. And every time I thought I had cut enough strips, I had to cut more.

About the time it became difficult to put more layers on, I added the ribbon to tie it off, wrapping it around the open section several times and securing with hot glue.


Yes, friends and family, you may get one of these for Christmas. :)


Cost: Wreath form - $4.50
Ribbon (leftover)- $0.50
Paper - $2.00

I have another wreath idea I'll be putting into life in the next week or so, so stayed tuned! Super easy and super cheap!

Tuesday, November 10, 2009

My first Dumpster Dive

Yup. I drove past a neighbor's trash can, thought about the contents, then turned back around and loaded up.

I found these three pieces from a room divider just sticking out of the trash. I've been looking for a tall picture frame or piece of art work to go in our hallway, and I think I can work these into something. The openings are 8X10, so I can either get prints of more wedding pics and such for it, or put together paintings or mixed media pieces for the frames. They're very nice quality.

And if I can't, well, they do collect the trash every Tuesday. :)

Thursday, November 5, 2009

Repurposed Pillows — With some razzledazzle


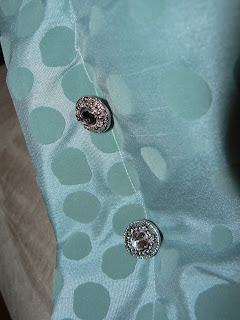
I wanted to add some colorful pillows to our living room, but they've been a little out of budget for me to buy them, plus, they're so easy buying a pillow takes the fun out of making a pillow. I found these pillows at a Salvation Army for $1 each. Yesterday, I cut off the ugly coverings to expose pristine stuffing.

I had found a lovely curtain panel at my favorite discount store for $10, but knew I couldn't use it in the living room, so I saved it for pillow fabric. I cut it up to cover the two pillows, and I still have some left over for another project.

The pillows would have been fine to stand alone, but they needed a little sparkle, so for $8 I bought 12 jeweled buttons.

When sewing, try using gray thread instead of white or black if you don't have a plethora of thread at your disposal. The gray is more neutral than either black or white and winds up blending pretty well into your fabrics and doesn't stand out as much.


Total cost of the project: $24 for two pillows. Not bad.

Tuesday, November 3, 2009

Bluegirl Designs - Check it out!


One of our most unique and special wedding gifts was this hand-embroidered art. Though it's in a frame, there is enough fabric that I can make it into a pillow if I wish.

Happily, instead of having to plan a wedding, get married and all the while befriending the lovely Brandi Bradley, creator of such fine embroidery, you can purchase items of similar crafty brilliance (but still befriend the lovely Brandi).

Check Brandi out at her Etsy store or follow her on her blog.

Wednesday, October 28, 2009

Trophy time


Here is a cool way to repurpose those participation trophies that your kids get at every recital or those old bowling trophies of your grandpa's.

For our Halloween party this weekend, I was recruited to come up with trophies for costume prizes. With a $3 kit of pipe cleaners, wiggly eyes and pom-pom balls and a hot glue gun, I was able to redesign six trophies for the contest.


The top photo shows two trophies, only their bases were the same before - a ballerina. Pretty sneaky for a spider, eh?

Tuesday, October 20, 2009

Slowly but surely...


A few posts back, I shared the white wingback chairs I bought at a flea market that I intend to recover. Well, I haven't done it yet. But I'm working on it. I've cut away the skirts from the white upholstery, because in the meantime, we're using them around the house. But when my mom came in this weekend, we got to go to Hancock's of Paducah, and I found this upholstery end for just $11 versus the $30-$60 price range if might have come in. It's just a yard, but this will likely be the seat on the chair that stays in our living room as an accent chair. It has the same colors as our rug (blue, green and brown), and will help add some texture since the rug is made of rectangles. Slowly, but surely, I'll get going on this project.

It's also hampered by the budget. Since moving, we've incurred many start up fees and such, so once our bank accounts aren't stretched to the limit, I'll be able to buy more materials and really get to moving.

Happy Crafting!

Farm-friendly invite

When I was home about a month ago, I attended a birthday party for my friend's son. And it was one of the cutest parties ever! He was turning 1, and had a farm theme. Amber made his cake, a Farmall red tractor, then made animals out of balloons, simply by blowing up round balloons and drawing faces on them with a Sharpie (the pink balloon, for instance, had a snout and pointy ears and a tail; the baby chicks were blown-up yellow water balloons. So cute!). Anyway, the best part of her party was her invitation, I thought.


She created these completely by scratch, as in using markers and drawing her own barns (notice the No. 1 for the silo?!). She even printed out her little boy's picture on her computer and put it in the invite. Even the language was fun!


Friday, September 25, 2009

Martha and Michael's

Don't know if this is an isolated sale, or nationwide, but Michael's has a good portion of Martha Stewart's craft goodies on super sale. Like 70 percent off sale. I bought three sets of note cards for $7 when they were originally about that much each.

Go getcha some!

Wednesday, September 23, 2009

Wall art courtesy a quilt

If you're like me and you are from the country, you've got some experience with quilts.

If you're like me and you're from the country, you've been given at least one quilt from a family member, or even have made your own. Some of these quilts are perfect to go straight on the bed. Some are perfect for fall football games or picnics. Some are good for pet bedding. And some are so beautiful, ornamental, meaningful that simple ordinary use isn't good enough for them.

For a wedding present, my mom had a quilt top she had made for me specially machine-quilted to look like it was hand-quilted. Mom embroidered the white blocks with pastel thread, then set them together with the rainbow plaid rows. The quilter then bound it with pink material, and even gave it rounded edges (very chic). It was a complete surprise, and I cried quite hardily at the church where the shower was held.

For me, the quilt is positively too pretty to sit back on a shelf in a closet, and too precious to have my idiot cat scratch it up when on the bed. So, it has become a backdrop for my craft station in the spare bedroom:


To hang it, I used some left over green satin ribbon from the wedding photo project below, and machine-sewed them into small loops. I then hand-basted them with double thread to the back of the quilt. You could also use the curtain clips that are popular now, but I was living on pennies when I did this earlier this week and also didn't want the clamp marks. If I ever want to take the quilt down, I can simply rip out the stitches without damaging the integrity of the quilt.

I'm so excited. It makes my heart swell with happiness when I go into our spare bedroom, which isn't a typical response people get with most spare rooms. But I do love the quilt so much and my mom, for making such a special memory for me. Thanks, Mom!

Monday, September 21, 2009

Kids craft

From this:


To this:


I put this together for a kids craft in the newspaper. It's just a spin on the boring tin can pencil cup. I called it an organization station. The only thing was, I thought it would be cool to connect them all using Velcro dots so you could take it all apart and transport it for different activities or whatnot. Which in theory, is a good idea. But my idea was to put the dots on top of scrapbook paper outsides. But when you separated the cans, the dots pulled off the paper. So not a good idea. If you do it, go ahead and hot glue it all together and keep it together.

Saturday, September 19, 2009

Vinyl lettering


I've been on bedroom duty, trying to finalize all the details in our place of sleep. After spending the past 24 years of my life with a multipurpose bedroom (office, homework station, social gathering), I was determined to create a dedicated space for relaxing, sleep and romance now that we have an extra bedroom and an actual home.

Our wedding photos came in, which allowed me to complete the wall decor. I purchased this vinyl art from Hobby Lobby, although I've seen Kohl's advertise them for much cheaper. I wanted to make it pop, so I added a pertinent wedding photo. This hangs over our bed.


I then developed five 5X7 wedding photos that told a story for a collage on the large blank wall. For $3 each, I bought plain black frames at Wal-Mart. I toyed with the idea of buying $1 frames from Michael's and spray-painting them, but I went for the non-work option!

To add a little razzle dazzle, I found a beautiful roll of satin green ribbon on sale at Hobby Lobby (it's very high quality, actually, I recommend). With some measurements, I tied nots in the top and strung them from the nail holes of the frames. My laser level helped line everything up.

Let there be light


For the past month, I've been obsessed with finding "matching lamps" for our bedroom. The only problem is, lamps, and their shades, are expensive.

After perusing several thrift stores, auctions and garage sales, I found a pair of these wooden lamps at a yard sale across the street. I paid $10 for the pair.

When I got them home, the hubs scoffed at them, and couldn't imagine how anything so out-of-style was going to fit in with our bedroom.

He later apologized when he saw the transformation:


I bought a $2 can of metallic spray paint at Wal-Mart, then lucked into the shades at the catalogue outlet store in town. Our comforter is white with green leaf accents, so they match perfectly. They were also $10 each, which is about $4 less than what Wal-Mart wanted to charge for very plain shades.

If you wanted to duplicate the silhouette effect, you can cut out shapes and paste them onto the inside of a plain shade, or even paint them.


The lamps cost a total of $32, and for their size and detail, would have cost more than $50 each at a design store. Other than the searching for a base lamp, the process took me 10 minutes to do with an hour of dry time.

Saturday, August 22, 2009

Singing about my Singer!


This little guy, whom shall be called Stanley henceforth, is the No. 1 reason why we had to move to a bigger place.

OK, I exaggerate only slightly.

But, Stanley here had been relegated to his cramped cardboard box since the day I got him, a Sunday in early May at my wedding shower. He was a present from my sister, and even after the wedding, I couldn't use him because we didn't have a place for him to live, permanently or even temporarily (our kitchen/dining table is bar height - couldn't reach the pedal). Anyway, we finally settled in enough for me to set it up Thursday night. And he's glorious!!!

Bargain, bargain, bargain!!!


Look at this gorgeous piece of potential!

I bought two of these accent chairs at my favorite flea market, The Shed, in Paducah. Cost? $8 for the pair. They are white upholstered and very dirty, but they don't smell bad. So my plan is to reupholster and refurbish the chairs, turning one into my desk chair and who knows what with the other.

Check back in with me as this becomes a long-term project. Cheer me on!

Tuesday, August 18, 2009

Craft time brought to you by the letter "H" for husband...

So the hubs thought he was getting all crafty and creative this weekend decorating his side of the spare bedroom. We both thought it was sharable.

Again, only slightly out of the box here.

One of the best tips I've read is the rule of posters and wall art. Don't be afraid to cut, chop or enlarge to make an aggregate singular piece of art. As per our rules of spare bedroom newlywed negotiation, we divided the room in half. Adam gets to decorate half, and I get to decorate half and we get to do as wish on our halves.

His taste in decorating included a punk poster of monkeys and a (in my mind, tacky) Jack Daniels poster. Anyway, we were conflicted in how to display both horizontally skewed posters above his desk when he came up with the idea to divide. Below is poster before and space after.


Trust me, it looks better in person. And now the hubs can say he's crafty, too. ;)

Sunday, August 16, 2009

Croptacular

This is one of those think-outside-the-box type of posts. This isn't earth-shattering creativity here, though.

My grandma is a self-taught artist, starting in the 1960s painting oils on canvasses my grandfather built her by hand. She has hundreds of paintings downstairs in her basement, just waiting for someone to love on them and hang 'em up.

I pilfer the basement frequently, and long ago, came up with this white-on-black velour 15X16 painting. I had it hanging in my apartment during college, and my first home here in Paducah. Once we moved to the new place, it needed some severe TLC.

The velour paper has not held up very well, and some of the paint is woefully starting to flake off. First attempts at getting the painting custom-framed were thwarted when Michael's was ready to charge me $100, and that was bare bones and with 50 percent off (it would have looked amazing, but I wouldn't have been able to afford to eat dinner for weeks).

So, I compromised and bought a $30 frame (with coupons, of course). The only problem is the frame is 12X16.


I fretted for a while, debating the merits and faults of cropping my grandma's original art. Then I remembered where I found the painting in the first place: the basement. A straight-edge and an X-acto knife later, and I had a much improved piece of art.

Amateur Abstract

Since my last post, Razzle Dazzle Crafting and its creator have moved into a new home — a rented duplex. This gives my husband and I a much better quality of life, seeing as we don't have to literally step on each other when we're in the kitchen at the same time.

The new digs also gives me a better opportunity for art and crafty time. I'll be posting some of our projects, which aren't necessarily crafty, or razzle-dazzle, but maybe just original and creative.

Creating a piece of art for a large bare living room wall was my first big project. At Hobby Lobby, I took advantage of the store's 40 percent off coupon that comes in the paper every other week. I bought a 2 foot X 4 foot blank canvass (for about $12), $8 worth of acrylic paint, cheap brushes, and a glass of Paducah Blue, a local wine from Lone Oak's Purple Toad Winery (delish!).

Anyway, I'm not a painter, but I think it turned out OK. I had a lot of fun doing it, and that's what counts. Plus, the hubs thinks it's pretty cool.

Here is the bare corner before decorating. And here is the finished corner. I bought the smoked teal glassware also at Hobby Lobby and on sale...the two large pieces cost me maybe $6 together. The lamp we got as a wedding present, and liked it so much, we bought another one to match.

Thursday, July 23, 2009

Triumphant Tile Table

I loved the reflective mosaic tables at Pier 1 last fall, and even though their prices dipped, I felt like I still couldn't afford to spend $30 on an accent table. So I made my own version, nothing at all like the Pier 1 version, and put it together for about $90. Total bargain. It will go on our patio.

End table from thrift store: $10
Backless frame from Hobby Lobby: $16
Black grout: $6
Decorative glitter tiles: $12
12 handpainted tiles (including studio time): $50
Total: $94

First assemble materials. Introducing Baxter. He was my ever-present helper on the endeavor. I found this table two years ago and it was just hiding in a corner. After browsing all of my tile options, I decided I wanted something eclectic so my husband and I had a date night at the local pottery paint shop, and paired the handpainted tiles with two packs of glitter tiles from Hobby Lobby. Subdued tiles were available at Lowe's and Home Depot.

I found a backless picture frame (which I could have gotten at a yard sale) to frame the tile and grout and glued and nailed it to the top of the table. I also glued the tiles on the table top with Aleene's Tacky glue. When it dried, the glue seemed to have done its job.

Grouting was a HUGE mess. I thankfully had the good sense to do it outside, otherwise I would have voided the security deposit on our apartment. I used powdered black grout mixed with water to give the table an edgy look, and spread it on with rubber gloves as the bottle suggested. Worked great. In the end, I threw away a wooden cooking spoon, a plastic mixing bowl, a pair of gloves and several towels used in the cleaning process. So if we add the cost of all that to the total, we're looking at over a hundred dollars for an end table. What a bargain.

And the finished product, complete with citronella candle (coincidentally from Pier 1, my original source of inspiration):

Friday, July 17, 2009

About this:

Welcome to Razzle Dazzle Crafting!!! My goal for this blog is to give visitors ideas for DIY crafts and decorating, along with many, many how-tos. Some will be original ideas, some will be inspired projects with original spin. (If the idea came from Martha, I'll be sure to let you know.)

Also, I'll try to give materials costs with all projects. While I am a huge bargainista, sometimes being crafty just isn't that cheap. Especially if you have to buy start-up equipment. But I love a cheap deal, so this could be a bragbook, too.

As for razzle dazzle, I love color and glitter and am attracted to sparkles. Most of my projects have pizazz. Hence the name.

Check back soon for more postings. I've just completed a summer project, so I'll post that soon!

Happy crafting!