Thursday, January 19, 2012

Soap bar pincushion

A page from Real Simple inspired my latest project...a soap bar pincushion.

In all my sewing, I still had my pins left in their original plastic pin box, which was annoying to say the least. I kept saying I wanted a super cute pincushion, and not just one of those strawberry/tomato things. 

To start, I bought a bar of handmade soap from the artisan market in Paducah where I sell my fabric bowls. The artisan who makes them had a dozen scents, and this one, mountain berry, has been in the craft room for over a month, and it's totally fragranced the whole area. And I supported a local crafter! You can use a brand name bar of soap, but this one was square, and I wasn't sure I could find one like it anywhere else. 


Then I picked out a fabric scrap I had in my stash. 


I squared off the fabric and made sure I had enough to wrap the bar in, just like you would wrap a present. To get things started with a crisp line, I stapled the fabric to the bar first.


Then I wrapped the other side over, stapling it tight as well. I made sure to tuck the raw end of the fabric under. I also added a strip of hot glue to secure the seam.


Then I continued folding just like I did three weeks before for Christmas. I added a few staples here and there to ensure tightness, but glued everything down and tucked in all the raw edges.


Finished end. I did the same thing on the other one.


When I was done, I had a wrapped package, but it was a tad plain. I thought about razzle-dazzling it up with some rhinestones, but didn't want it to interfere with the pins. So I cut a length of white satin ribbon to cover up the seams and the few remaining exposed staples, hot glueing it down (tuck in the raw edge!).


And there you have the finished project! 


I had picked out the purple fabric weeks ago, then for Christmas, my friend Jennifer MADE ME a wrist pincushion, which was next on my list of things to tackle. She made it completely from scratch, even hand-sewing where a machine would have made her life so easy! I love wrist pincushions to have a place to put my pins when I'm done sewing...my dear Desmond, brother, doesn't really like sewing over pins, so I have to take them out as I go.


Sunday, January 15, 2012

10 minutes of organization

This week, I went through all of my old scrapbook stuff and attempted to organize it in a way that is more crafty, less scrapbook-y. Which went well. (I'm not scrapbooking anymore...too time consuming, and plus, I'm in love with Shutterfly.) Anyway, in my rummaging, I found clear page protectors, which inspired me to put them to good use.

So a trip to Wal-Mart for binders led to this:


Yes, that's a Mudslide in the pic. :)

Which led to this:


I had recently gone through over a hundred Real Simple and Better Home and Garden magazines for the sake of recycling, and had ripped out several ideas/inspiration pages that were just stacked on a clipboard. And I realized I had several patterns for quilts and such, and why not keep them in one place? So I feel good about my future organized productivity plans.

Also sad to report that Wal-Mart binders were much cheaper than binders at Office Depot, which is one of my favorite stores, and was also open past 7 on a Sunday night. Damn Wal-mart yet again!

Thursday, January 12, 2012

Quilt Crazy

I mentioned in my last post that I made a quilt for my mother-in-law for Christmas in 2010, so I wanted to make sure I included pictures.

It all starts with a pattern. I knew I needed something with plenty of rotary cutting and straight lines, because even though I've made four quilts and two wall-hanging in high-school and college, it had been a while since I had done anything this complex. I chose "Basket Weave" a pattern by Diana McClun and Laura Nownes. The pattern was quite easy, for the most part, if you read directions. I, of course, have zero patience, so I spent a good deal of deadline time ripping stitches.


Next are the fabrics. I knew I wanted to do it in blues, but no Duke-blue. My in-laws are from North Carolina and they are decided UNC fans. I spent an entire hour picking out eight shades of blue with as little Duke-blue as possible!


Most quilters, especially the younger ones breaking into the craft, are experienced rotary cutters. I don't think I will ever make a quilt I can't cut entirely with a rotary. There are a few different rotary methods (my mom and I each do it differently). I like to iron my fabrics, fold them in half again, and line them up on my ruled mat. Then I slide my ruler away from the cuts, leaving the cut out in the open.


Of course, you need a helper:


And this was the finished quilt-top. Martha's Quilting in Ledbetter, Ky., did an excellent job quilting it, and included an embroidered gift label on the back.


The husband's cousin was also set to have a baby this fall, so I made this baby quilt in the nursery colors:


I made it from a pattern I received from my high school home-ec teacher, and it's super easy. It involves about three yards of fabric, and it is good for a baby quilt or a wall hanging.

I loved the way the borders turned out:


I wound up quilting this one on my machine, using the Warm and Natural cotton batting, and sadly I wasn't very happy with the end result. I didn't have a walking foot and my machine at the time couldn't drop its feed dogs, so it was a little puckered in places. But it was still quite vibrant and I hear the recipients loved it!

Hello World!

I'm back! Yes, I've been gone too long, and it's embarrassing to get back to this blog after so long. But let me explain:

It all started when I decided to make a quilt for my mother-in-law for Christmas. Since it was a secret, and some of the family check out this blog once in a while, so I couldn't post anything about it. And it consumed all my crafting time for about three months.

After that, I got serious about a book I'm writing. It's a children's middle-reader novel, and as of yesterday, I've FINALLY finished the structure of it all. Now I have to edit. I have since learned that crafting and free-writing are nearly mutually exclusive, so I really wasn't crafty at all for several months.

In the spring, I attended the AQS Quilt Show and Contest in Paducah with my mother, and I was completely inspired and compelled to craft again. I bought patterns and more supplies, and by the summer, I was again in full crafting swing (I was also taking a lengthy break from book-writing at this point!).


I learned to make these, which I have since begun selling at a local market and have plans in the very near future to open an Etsy site. Stay tuned! In a six month span, I counted I've made over 40 of these fabric bowls for wedding presents, Christmas presents and custom orders. In the month of December, I was still making bowls on the eve of Christmas Eve. Whew!


In the process of making the bowls, I killed my first sewing machine (RIP Stanley the Singer) and wound up buying a nice Brother machine, which is named Desmond. (My husband and I had just finished watching all six seasons of LOST on Netflix, hence the name).

For my friend Jennifer's birthday in December, I made these pillows for her bedroom. Ask for throw pillows and someone might actually listen...


And notice the black stitch? Just one of the many functions of my new sewing machine - twin needle stitching! Love!

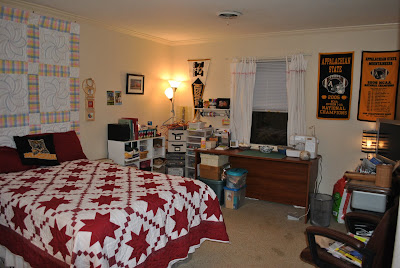
If you give a mouse a cookie....well, if you teach a girl to craft, she's going to nee a place to do it. My husband agreed to give up his dreams of a man cave in the spare bedroom to give me a craft space. It works out, because when I'm in the spare room, he gets the TV and the Playstation all to himself. :)

So it started like this before:


To this after:


And somewhere in the past couple months, we created a photo wall. If you haven't designed one of these, let me tell, you it is WORK. They look stunning in magazines and on Pinterest (my other new addiction!), but they are far from easy, and far from cheap. This one was done on a budget, using frames from Goodwill and on clearance at Michaels, many of which were spray-painted black. Then there was the trouble of picking out photos and getting them printed. And finding mats when needed. And having the right nails. In the end, this wall cost us about $100 with all the supplies.


We used a ton of painter's tape to mark and level, and still, everything isn't perfectly spaced. And word of advice: purchase a laser level . We actually use it all the time. It's wonderful.